As a new trader, a vital step is opening a trading account. In the video below, I walk you through how to open an account with Charles Schwab step by step.
Step 1 – Where to go on the website
Go to www.Schwab.com and click “Open an Account” in the upper right hand corner.
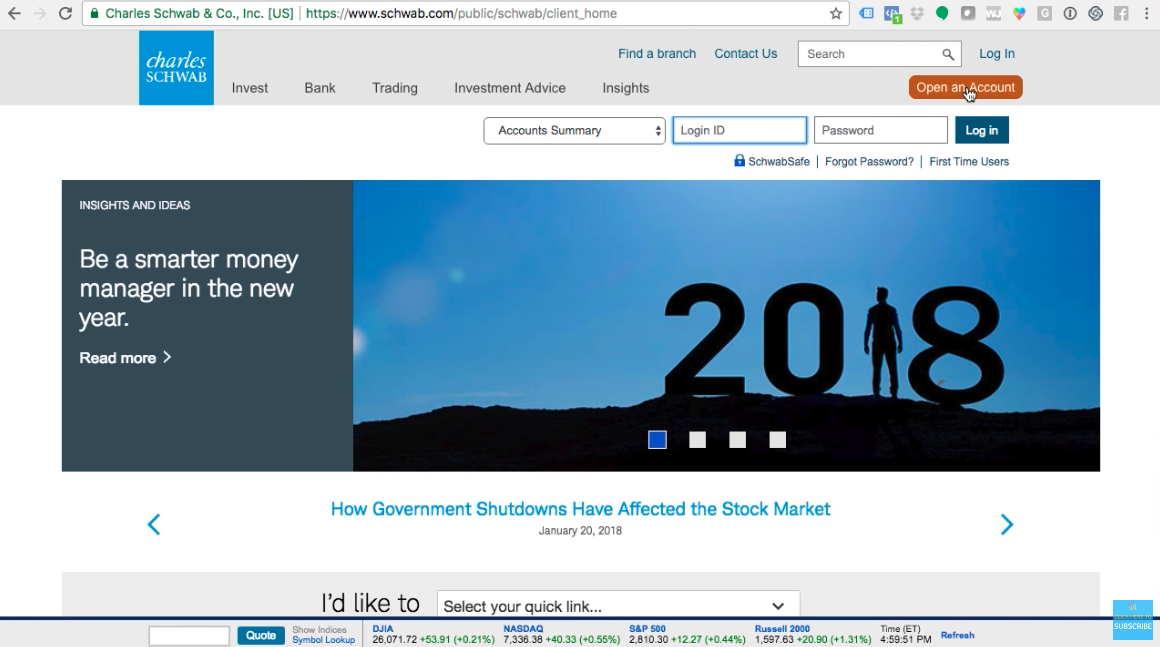
Once you click that button, there are a few options you can choose. We want to click “Brokerage Account” so that we can trade and manage our own money. Click “Individual Account”.
Step 2 – U.S. Resident
Once you have clicked “Individual Account”, it will take you to a page where it will ask you if you trade more than 3 times per month. You want to check that box to indicate yes, that is what you want. It does not mean you have to trade more than 3 times a month, but they are looking for an active trader.
You will need your social security number and your employer’s name and address to open an account, as noted on the page.
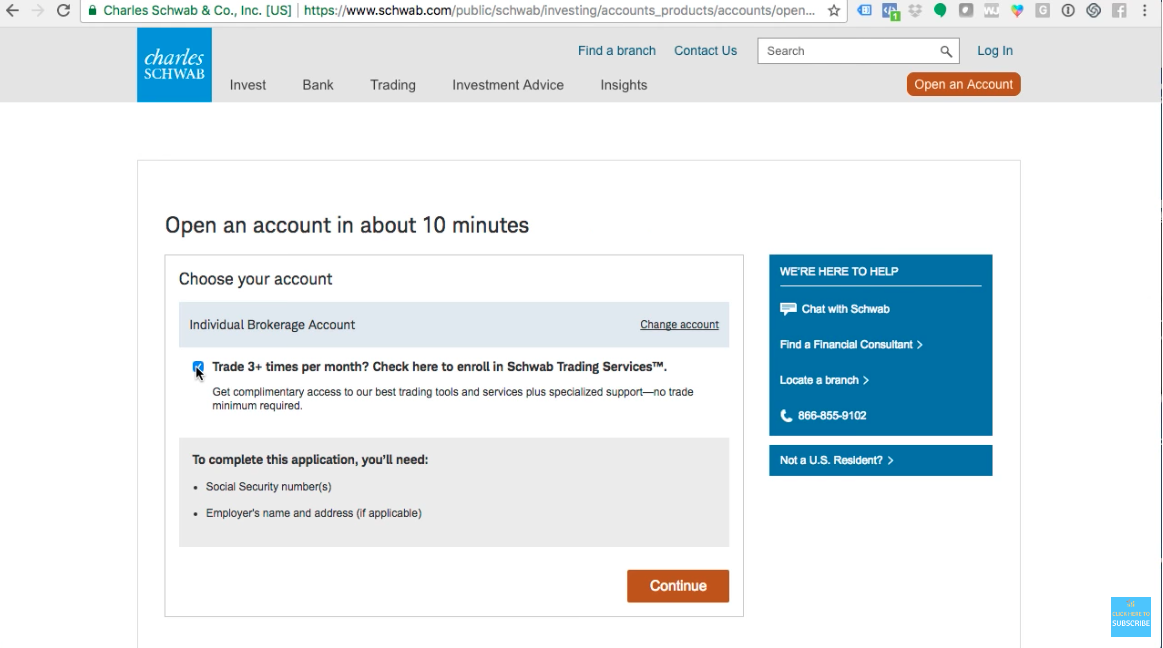
The next page will show you a few things that you will need to open an account.
Note: You must be a U.S. Resident to open an account with Charles Schwab. We have many people who live outside the United States, so you need to find a brokerage account that works for you. For example, for our Canadian friends, we recommend checking out TD Waterhouse. If you live outside of North America, there is also “interactive brokers” which allows you to trade the American Stock Market. This tutorial is just for those who live in the United States.
On this page, it is going to ask you if you have a Schwab login ID and password. This is asking if you have any account open with Charles Schwab, for example, if you have a 401K or IRA open with them. If you do, you will login under that ID. You will simply be opening a second account with them, a trading account. All your accounts will then be in one place. But assuming you do not have an account open with them at all, you would click “No, I’m new to Schwab”.
Step 3 – Personal Info
The next page will ask you what your personal information is.
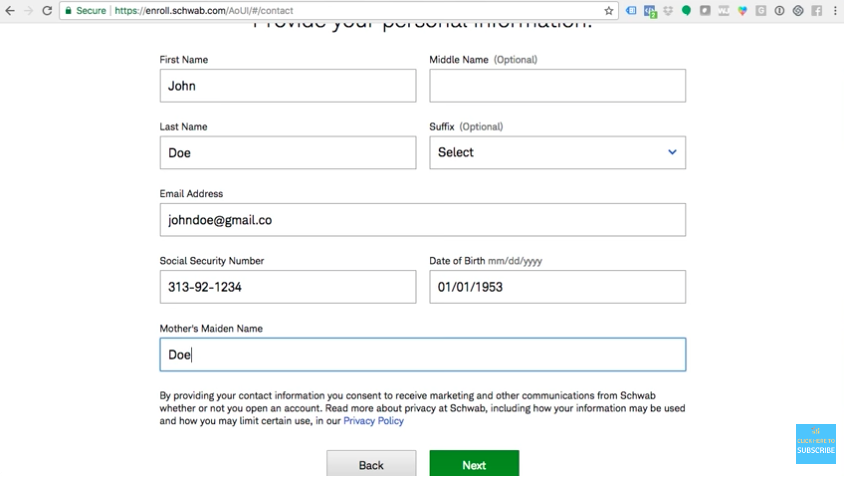
Fill out your first and last name, your email address, your social security number, your date of birth, and your mother’s maiden name. (Obviously the information above is NOT real.)
Click “next”.
The next step is to create your login ID and password. Follow the steps to create your login ID and then type in your password twice. You then will select a security question and answer.
Click “next”.
You will then be taken to a page to input your address and phone number, it can not be a P.O. Box. You want to make sure you select a phone number where you can truly be reached at.
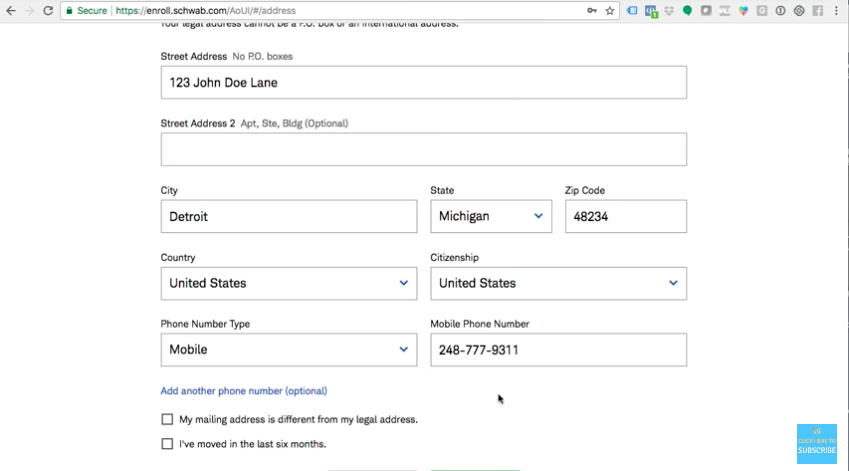
They will check and verify your address, so be sure to check if your mailing address is different from your legal address or if you have moved in the last six months.
Click “next”.
You will then be taken to a page that requires you to provide your employment and financial details. Here’s the thing – just tell the truth.
If you are employed, select “employed” from the drop-down menu. If you are a stay at home mom or dad, select “homemaker”, or if you do something else, select the correct choice.
Then you will select from the drop-down box what your occupation is.
You then will type in what your employer’s name and address is.
Then, you will type in your annual income and liquid net worth.
Click “next”.
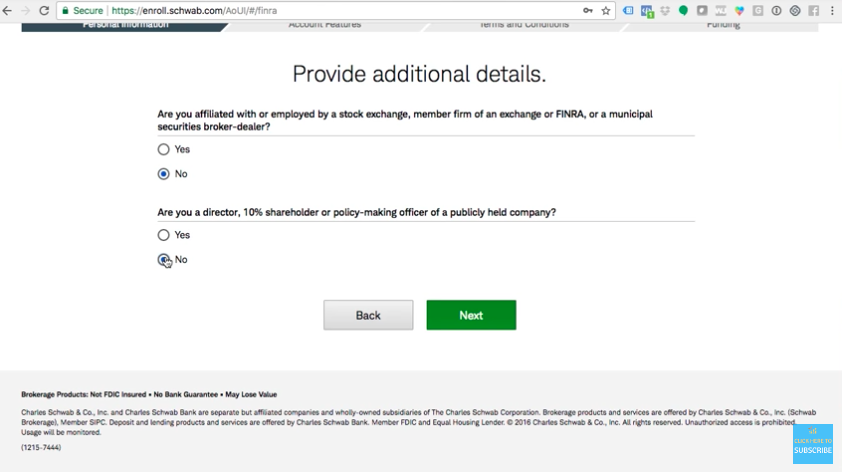
The next page will ask you a few questions regarding working with the stock market or a member of a firm or exchange. If you are in any way, be sure to click “yes”, because even if you make your trades and money on your own, they may see it as “insider trading” if you clicked “no”. Of course, if you do not have any affiliation, click “no”.
Click “next”.
Step 4 – Account Features
On the next page, you are going to provide some additional details about your account.
For example, where are you getting the money to invest? Are you going to be investing your salary, your social security benefits, etc? Check all that apply on the page.
They also are asking you what the purpose of the account is. For example, general investing, pooled assets, for college, etc. Again, select all that apply. The average person will select “General Investing”.
These questions will help Charles Schwab to ask more specific questions or to make sure that you have the correct training to trade.
Click “next”.
Step 4B – Account Features Part 2
The next page will show you optional features that you can add. This is where is gets interesting. Up until this point, everything has been about your personal information, now we see it change to be more about your account.
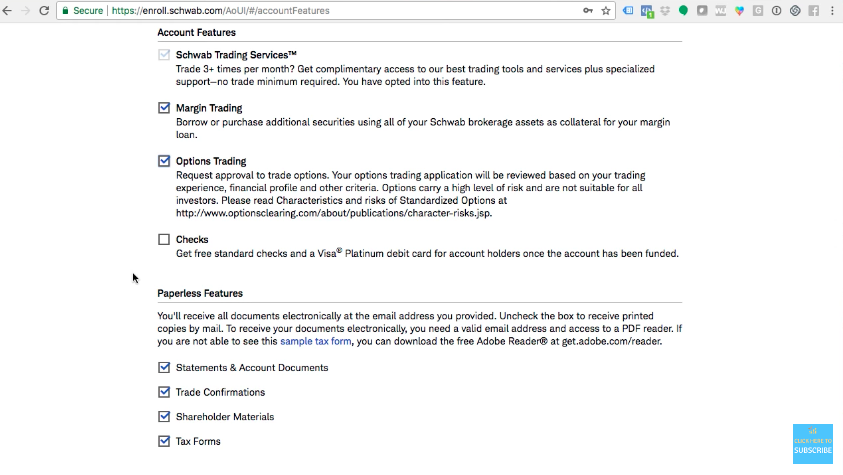
The first check box is default – “Schwab Trading Services”, which indicates you will be trading on average more than 3 times per month and you gain access to their tools, services, and support.
The second box is “Margin Trading” – we typically do not recommend this. Margin allows you to borrow money against your brokerage account. For example, if you have $100,000 to trade with and then you borrow another $100,000 from your broker to trade with. We do not teach this, however, for the sake of having all options available to you, I would leave this checked. If you are a person that does not have self-control or good spending habits, I would uncheck it so you do not have the ability to borrow money from the broker. You can always call them back at a later time to change your account to a Margin Account. But if you are someone who has the skill set and knowledge to trade and know when it would be smart to borrow and know how to pay it back, you can leave it checked.
The third option is VERY important to what we teach at the Brown Report and Power Trades University. This is Options Trading. This is a request to be approved to trade options, your request needs to be reviewed based on your experience and financial profile. If you have taken my course, Options Explained, then you should be prepared to option trade. If you are in the process of taking the course, you can check the box. If you are not interested in options trading and just want to trade stocks, you may want to leave that box unchecked.
The last box is regarding checks and debit cards linked to your account. I recommend leaving it unchecked because you do not to use your trading account as if it were your bank account. You are not going to go grocery shopping, etc for it. When things get tough, you do not want this helping you to pay rent. If you are in that situation, this is not for you. You need a bank account.
At the bottom of this page, there are Paperless Features. You will want to leave all four of those boxes checked. You do not want to miss anything in respects to your trading account.
Click “next”.
Now it is going all about your trading abilities. I personally am Level 3.
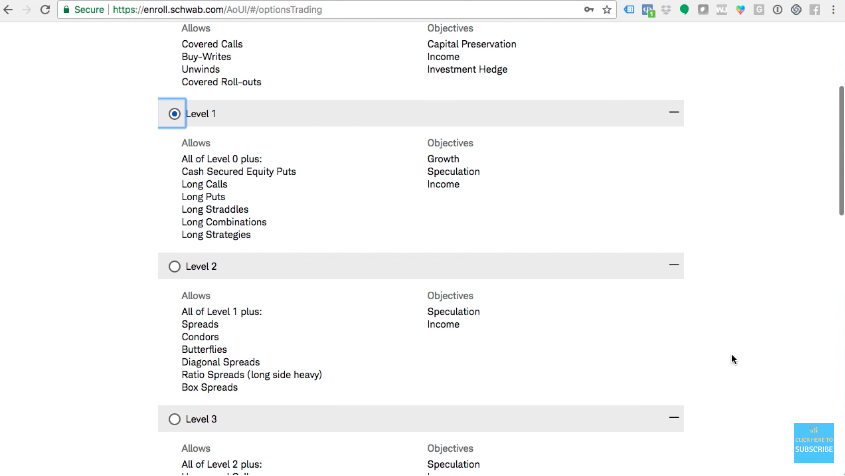
Level 0 allows for covered calls.
Level 1 allows for long puts and long calls, which means you can buy calls and puts and also do different strategy. This is where most people are going to check. We teach how to buy calls and puts in the Options Explained course.
Level 2 allows for spreads and butterflies, which we cover in our Advanced Options Course. If you have taken this course or are planning on taking it, you can check that level.
Level 3 is everything plus uncovered calls and puts, at this time they are looking at your income level. You need about $50,000-100,000 in your account. You need money and time to cover you.
After you choose your level, it is going to ask you about your family information, like your marital status. Do not lie.
Next, it will ask you your knowledge about the stock market. If you have taken any of my courses or someone else’s course, you can select “good” or “extensive” from the drop down menu. If you have just looked up a few free videos online, select “limited”. And if you just know you need to open an account and have no prior knowledge, select “none”.
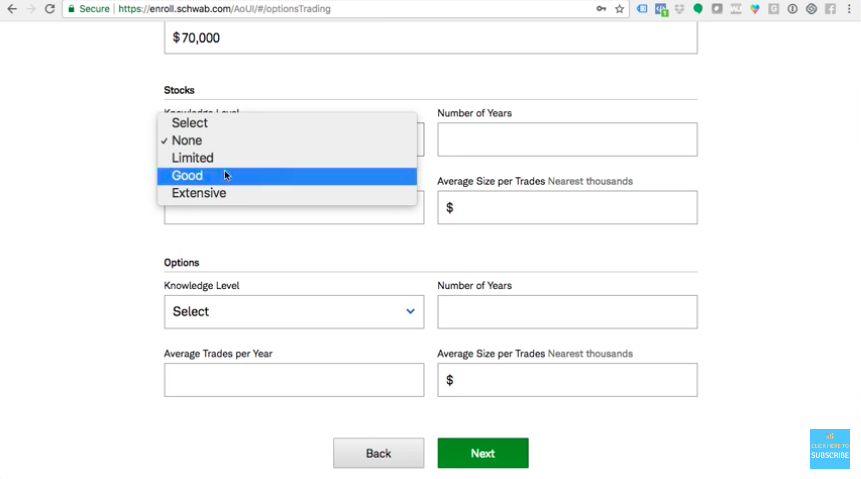
It will also ask you about the number of years you have been learning about the stock market. Then it will ask you the average number of trades per year. Remember, we said on average 2-3 trades per month. So that would average about 24 trades a year. Then you want to put in the average size per trade. I would believe most people will be starting with around $5K. Do not make anything up. Remember, they are also checking your income status, everything needs to make sense. However, it may be a red flag if you input that you just have $500 to start. What do you hope to be trading soon – $5K? That is the goal within a few months that will be the size of your trades, so put that.
Next, they ask you about your Options Knowledge level. If you have taken a course or are taking a course specifically about options trading, like my Options Explained course, go with “limited” or “good” from the drop down menu. If you are in the first year of learning how to trade options, type in “1” for how many years you have been learning. Similar to your stock trading, you will input “24” for the answer to number of trades per year. And the average size per trades should remain the same as stock trading.
Step 5 – Terms & Conditions
Click “next”. You will be taken to the Terms and Conditions page.
You need to check each box for acknowledgement. You will also typically sign with the last 4 digits of your social security number. Check the box to confirm that you would like to receive notices electronically.
Also check the box that confirms you can sign things electronically. Otherwise, you would need to deal with the hassle of being faxed something to sign and faxing it back, etc.
Next, it is going to ask if you are a “nonprofessional subscriber” or a “professional subscriber”. Read the descriptions to identify what you are. Typically, you are a “nonprofessional subscriber”, which means that you are not a financial advisor, do not work for the stock market, and are not using this account for commercial use.
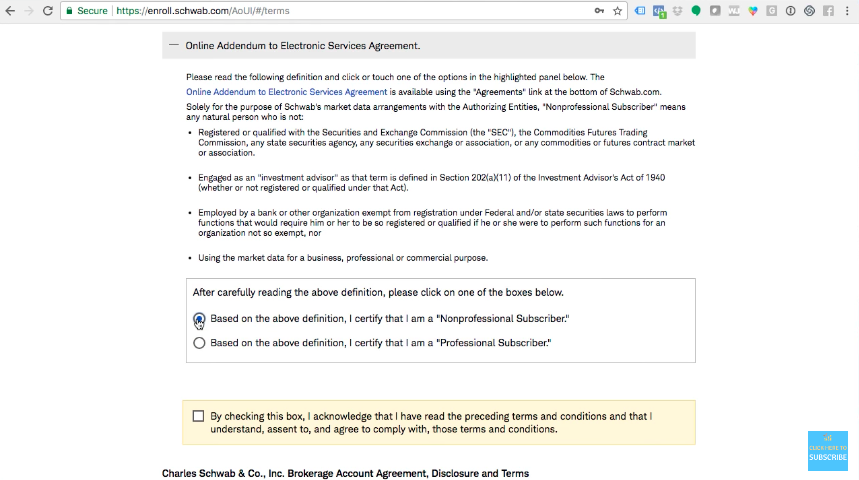
Be sure to click the Terms and conditions and check the box that you have read and understand it. There is also a box to check that acknowledges you are applying for authorization to trade options. Definitely check that if you are interested in trading options.
Read about the cash feature program and check the box if you would like to enroll in it. This says they will pay you interest if you have money sitting in there without activity. But be sure to read them all.
If you owe backup withholding from the IRS, you have to check the box “yes”.
Next, there is a legal document you must read and certify. Be sure to read the whole thing through, and then check the box.
You then you need to agree to the terms of the contract, and check the box which indicates you will be signing the contract.
In the demonstration video, I will not be hitting submit because all of the facts I used were made up.
But you will hit SUBMIT at the bottom of the page, which takes you to the next step, “Funding”. That helps you indicate how you want to fund your account. For example, are you going to mail them a check, transfer money from a bank account, etc?
CONGRATULATIONS you are well on your way to learning how to have your money work for you instead of you working for it. You are now equipped to handle this journey.
If you want more information about the stock market, be sure to register for my free webinar “Stock Market Secrets” by clicking here.
